Microsoft Office 365 Retention Policy: How to Set, Apply & Avoid Pitfalls
Microsoft Office 365 Retention Policy helps you manage corporate data. However, we still witness its misinterpretation and misuse. For example, in August 2020, the admin of KPMG deleted personal chats in Microsoft Teams for 145K users. The estimated downtime lasted 10 days (7 business days) and some employees stated that the data vanished irrecoverably.
We can only assume how much money a global enterprise with ~$30B annual revenue lost as a result of this mistake.
In this article we’ll answer the following questions:
- What is a retention policy?
- What are the common misuses?
- What’s the difference between data retention and archiving?
- Are there retention limitations in Office 365?
- Is there an O365 default retention policy?
- How to create a retention policy in Office 365?
Microsoft Office 365 Retention Policy: What It Is and What It Is Not
Microsoft 365 retention policy is a set of automated rules that helps Admins follow guidelines, manage data, and save storage costs. Office 365 retention policy should not be confused with Microsoft 365 backup, archive, deletion protection, or retention labels.
IT Admins can create data retention policies in Microsoft Compliance Center to ensure proper data management. There are several configurations you can change:
- The retention period begins either from the creation date or the last modification.
- Further actions with the content after the retention period is over (delete, don’t delete).
- The age of the content that should be deleted.
- Limit the application of your policy to a certain type of content (e.g. medical data, financial data, etc.).
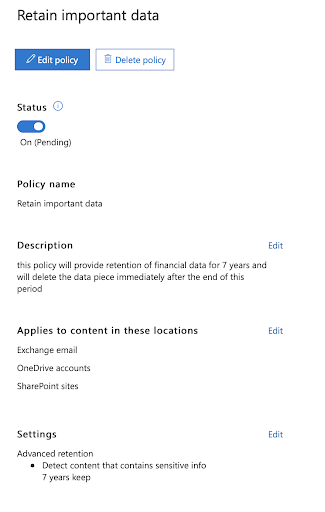
Check out the data retention policy example:
Learn how to assign retention policy in Office 365 in our step-by-step guide below.
Office 365 Retention Limits
Technically, Microsoft doesn’t put any limitations on retention. You can create as many retention policies as you wish and protect as many data items as you want.
However, the size of the data that you protect by the policies impacts the storage capacity of the Microsoft services. Let’s study the following example.
Alice works as a Project Manager at a marketing agency. She runs a promotion campaign for a new soft beverage. The project includes market research, calculations, and planning, branding, website development, creation of advertising materials (including TV commercials), etc.
On her OneDrive she has a special folder ‘New Soft Beverage’ where she stores all the data pertaining to the campaign. The size of the folder is 150 GB. It is shared with legal, marketing, web production, design, and video production departments.
The whole folder is subject to the data retention policy. Every item in it will be retained for 5 years since the last modification. The video files and website data would last even longer (10 years).
Now, let’s assume that the video production team downloads 20 hours of HD video materials they’ll be using to create the TV commercials and online viral VODs for YouTube. That’s approximately 200 GB.
Greg, a newbie, occasionally deletes all the videos from the folder. Luckily, Alice sees it almost immediately and the files are restored.
But what happened with retained data? Microsoft created a copy of each video and stored all of them (200 GB) in the Preservation Hold library. It literally consumed 200 GB of Alice’s OneDrive Storage. Alice still has approximately 4.6 TB of free space, however, but she’ll run out of it in no time.
Obviously, the case with video files is a rare one. However, keep in mind that even Word and Excel documents can consume all your storage in the end.
There are 2 reasons for that. First, Microsoft creates a copy every time someone edits a document. Second, the longer you retain files the more size you take.
O365 Default Retention Policy
Except for the Exchange, there’s no default policy. As mentioned above, to introduce one the Admin must create it manually in the Compliance Center. In this section, we’ll give a short overview of the default retention policy for your inbox. Keep in mind, that you can always change it.
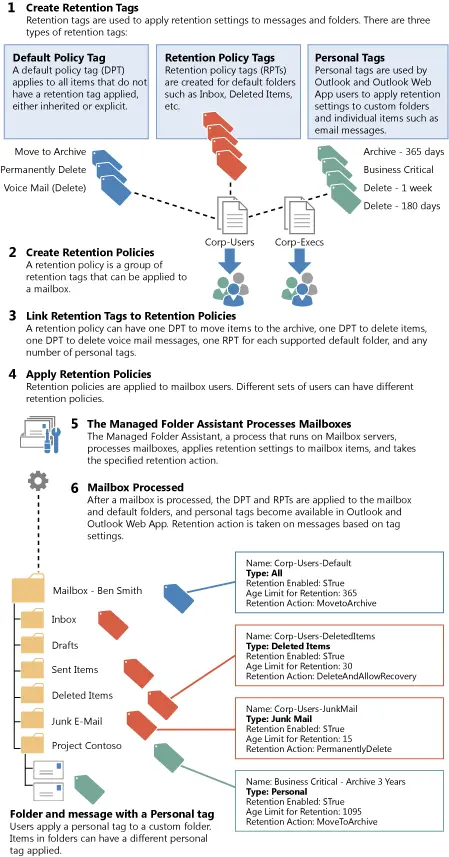
To understand this subject, you need to understand the retention tags and Messaging Records Management (MRM). Creating an appropriate retention policy helps organizations comply with legal requirements and regulations.
Now, a retention tag is a sort of a label that explains which retention policy Microsoft should apply to a certain folder or email in Exchange.
There are three types:
- Default policy tag (inbuilt function of Exchange)
- Retention policy tag (created by the Admin)
- Personal tag (created by the User)
Default MRM policy for Exchange governs:
- default policy tags (moves all the content under this tag to archive in 2 years)
- recoverable items folder (moves all the content to archive in 14 days)
- personal tags (sets the deletion or move to archive rules)
This policy is automatically applied to all the content that has no tags as well as the content of the new users.
Don’t Confuse Retention Policy with Backup and Archiving Solutions
Spinbackup experts communicated with multiple organizations about how they apply Office 365 and its tools. We saw that oftentimes people confuse retention policy with data loss prevention, backup solution and sometimes archiving.
Let’s take a look at each instance in detail:
Deletion protection
Other professionals also spotted these mistakes. For example, a digital consultancy firm Perficient warns the Office 365 Admins about the misinterpretation of the data retention policy. Many companies used it to prevent files from permanent deletion.
The fault is in the name itself. When you hear ‘retention’ you assume that it’s something related to document preservation. You would anticipate that such a policy prevents certain files from deletion. In reality, however, it doesn’t work as you would expect.
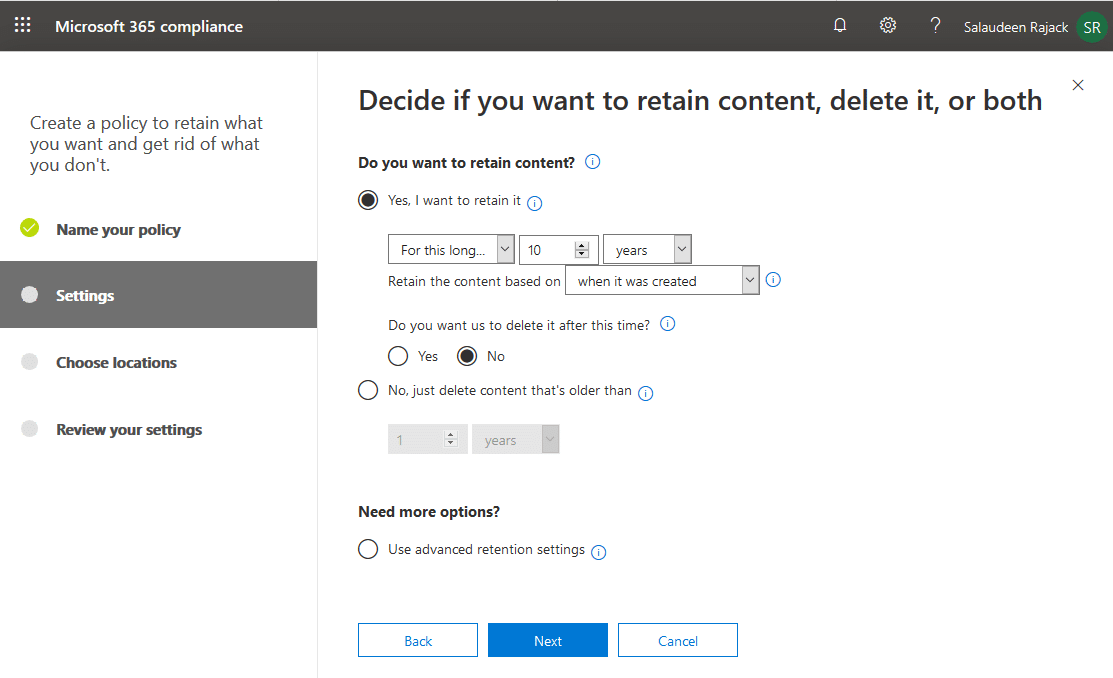
Let’s take a look at the page of the retention policy configurations:
As you can see from the picture above, when creating a retention policy, you can set 3 basic options:
- Retain the content forever
- Retain the content for a certain period of time (and then delete or keep it as is)
- Delete content older than a certain age.
Keep in mind, however, that the retention policy doesn’t prevent the deletion. Instead, it creates a copy of the deleted items in a “safe” location:
You can protect specific files and/or folders from deletion by using labels.
Data Backup in Office 365
The procedure of recovering the deleted content will be hard. You might expect that the safe location (aka Preservation Hold Library) will look like a regular recycle bin. You can simply go there and scroll down until you find your deleted items.
In reality, you’ll need the Search option in Office 365 Security & Compliance Center. Furthermore, to find specific information there you have to use keywords (if you know any).
Now, let’s assume that 145 pieces of data (files, messages, emails, contacts, etc.) were deleted from corporate accounts. How much time will the retrieval take place? What if there are 1,450 pieces? Or 14,500? For this very reason, you can’t use the O365 retention policy as a backup.
Read our articles on how to backup Office 365 data:
To prevent your data from being lost and comply with regulations we suggest using backup solutions like Spinbackup. It can help you not only retain and easily retrieve your data but also protect you from ransomware. Learn more!
Archiving in Office 365
As you know, Microsoft provides 100 GB of storage for Outlook. However, some roles like sales require sending thousands of emails per year. No wonder, they run out of storage quickly. Meanwhile, the needs of the business or the applicable legal regulations might require keeping the emails in your inbox. In this case, the archiving feature comes in handy.
It creates an additional mailbox with 100 GB of free space. Outlook automatically places all the emails older than 2 years there. Users can easily access it from their Inbox and perform searches. Furthermore, they are also able to manually move their emails in the archive mailbox.
Admins can set up automatic or manual archiving for certain people or everyone in their company.
So, what’s the difference between retention and archiving?
| Retention | Archiving | |
| Area of application | OneDrive, Sharepoint, Outlook, etc. | Outlook |
| Selectivity | Retains only specific data | Retains all the data |
| Deletion options | Deletes data | Doesn’t delete data |
| Shared goals | Comply with retention regulations and manage data efficiently | Comply with retention regulations and manage data efficiently |
| Unique goals | Delete unnecessary items | Expand storage capacity |
The main drawback of Archive is that it preserves data indiscriminately. In 2017, according to Workfront, an inbox of a regular US employee contained 199 unread messages. For C-level, this figure is probably even higher as they are the target for the outreach campaigns.
There are hundreds of emails each month that are not spam, but they’re unnecessary by nature (or become such in no time). For example, unless you unsubscribe, messengers send an email each time you receive a message. The default send-outs of multiple tools, platforms, and media aren’t spammy. However, together they create an overwhelming amount of information no human can process.
The Microsoft archiving option retains all these messages regardless of their value. And we can’t expect every employee to clean their inboxes thoroughly on a regular basis as they have so much on their plate.
That’s why the best practice here is to use Retention and Archiving options alongside.
How To Create a Retention Policy In Office 365?
1. Go to Compliance Center and select Policies in the left-hand panel. You’ll be followed to the necessary page. There, you’ll see the list of policies. Click on the Data section. In the drop-down list select Retention.
2. You’ll get to the Retention tab of the Information Governance page. Click on New Retention Policy to start the Wizard.
3. A popup window will appear featuring 4 steps of retention policy creation:
Step 1: Give your policy a name and description. Then click next. The description is optional. However, if you intend to use many policies, we suggest you write down the timeframes and the type of content.
Step 2: Define if you want to retain or delete the content. Click Next. This step also contains advanced settings. Choosing either of them will create an intermediate step. If you pick the first option (the content contains specific words or phrases), you’ll need to specify the keywords.
If you choose content that contains sensitive information, you’ll need to select what type of information it is. If you haven’t found the necessary type of sensitive data, click on Custom. This will create an intermediate step where you can look up 152 info types. Click Add and proceed.
Step 3: Choose locations (like Teams, Skype, Sharepoint) and click Next.
Step 4: Review your settings and complete the retention policy creation or save the policy for later or cancel the process.
Was this helpful?
How Can You Maximize SaaS Security Benefits?
Let's get started with a live demo
Latest blog posts
Midnight Blizzard Attack on Microsoft: Key Lessons for Strengthenin...
Midnight Blizzard Attack on Microsoft: Key Lessons for Strengthening Your SaaS Security From November 2023...
Why a Reliable Backup Plan is Your Best Defense Against Cybersecuri...
…and the Most Boring Way to Protect Your Organization I’ve written about the importance of...
Why Google Drive Backups Are Important
Google Drive offers customers a unique blend of robust security features to keep their data...


